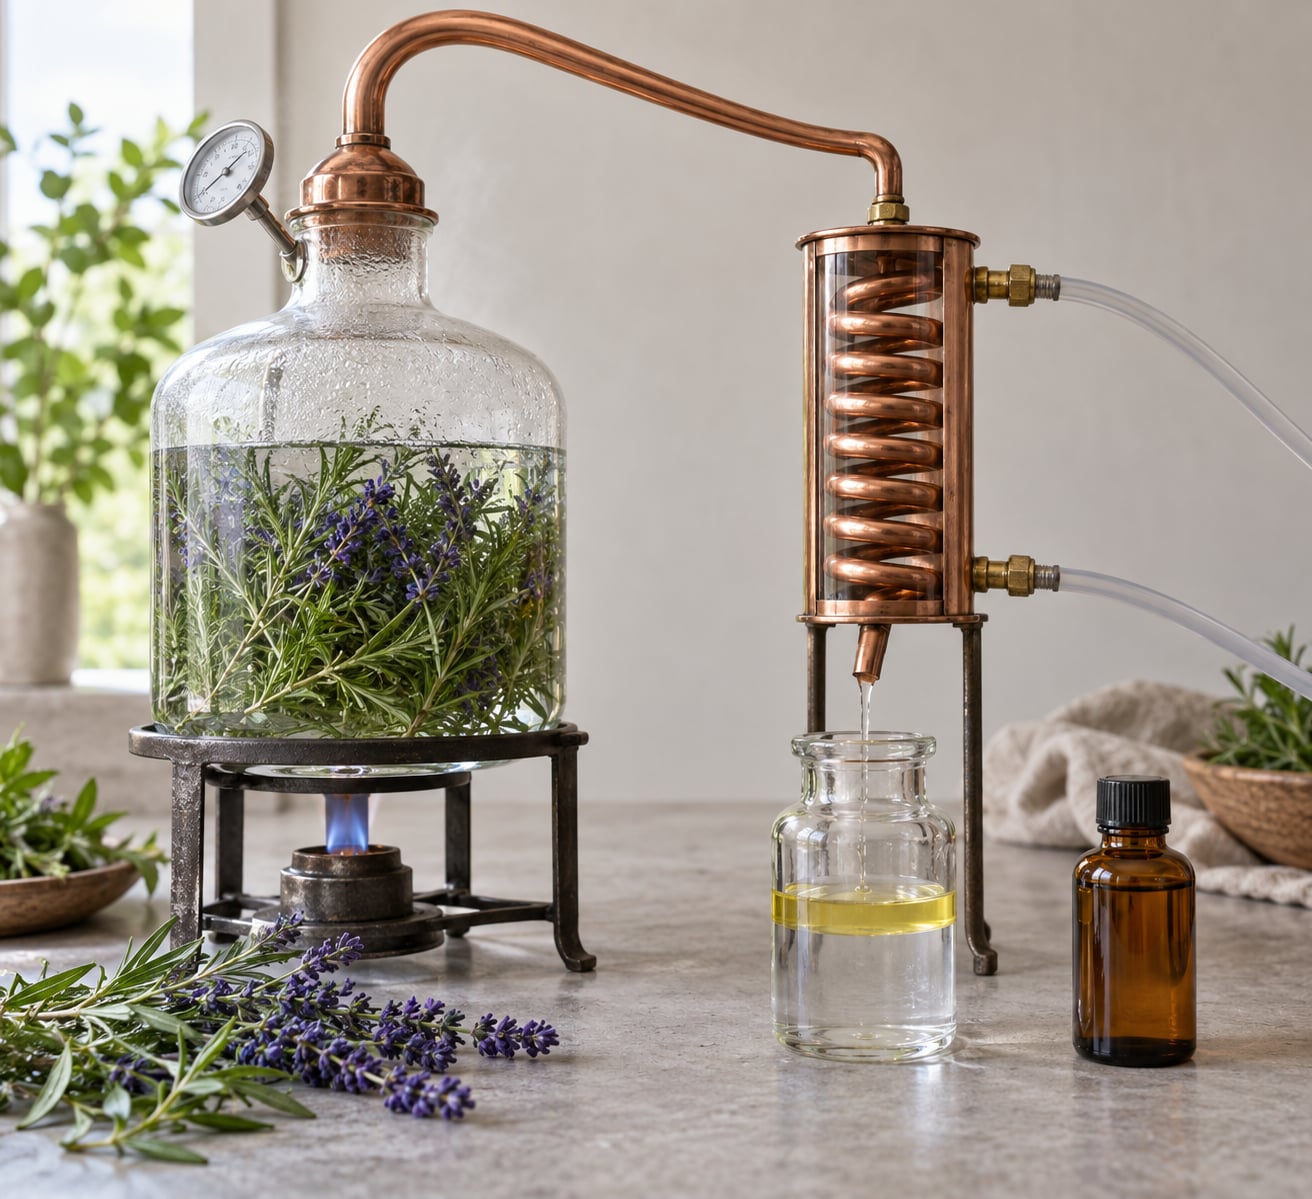
Essential oils are distilled by passing steam through plant material. The steam picks up the plant’s volatile aromatic compounds, carries them into a cooling coil where they turn back into liquid, and because oil and water do not mix, the oil separates out from the water, which is called a hydrosol. That whole sequence, load the plant, heat it, condense the vapour, separate the layers, is what everyone is describing when they talk about how essential oils are distilled.
The interesting part is how little oil you get out of a lot of plant. A farm-scale run needs roughly 120 pounds of lavender to produce somewhere around 200 to 300 millilitres of oil. Beginners usually discover this after a full day of work, which is why it pays to understand the process before you buy anything.
In short, here is the sequence:
- Plant material is prepared and loosely loaded into the still
- Steam is passed through it at a controlled heat
- Volatile compounds travel out with the vapour
- The vapour is cooled in a condenser and collected as liquid
- Oil and water separate by gravity, and the oil is drawn off
- The oil is dried, labelled and stored in dark glass
Nothing about that list is complicated. The heat and pressure side of it is where people get hurt, so that is where I would put your attention first.
Table of Contents
- 1What You Need
- 2Step-by-Step: How Essential Oils Are Distilled
- 3Step 1: Prepare the Plant Material
- 4Step 2: Set Up the Distillation Equipment
- 5Step 3: Heat the Plant Material Gently
- 6Step 4: Condense and Collect the Distillate
- 7Step 5: Separate the Essential Oil from Water
- 8Step 6: Dry, Filter, and Store the Oil
- 9Common Mistakes
- 10Frequently Asked Questions
- 11What is the difference between steam distillation and cold expression?
- 12Can I distill essential oils at home, and what is the safest method?
- 13Why do the oil and water separate after distillation?
- 14How can you tell if an essential oil is 100% pure?
- 15How long does it take to distill essential oil from lavender?
- 16Do essential oils need to be cured before use?
- 17Conclusion
What You Need

Here is the practical equipment list, roughly in the order you would set it up:
- Fresh plant material, correctly identified and free of mould, road dust and sprayed chemicals
- A heat source, ideally an electric immersion heater or a controlled hot plate rather than an open flame
- A vapour path, a still pot or retort with a tight-fitting lid and a takeoff pipe
- A condenser, a copper or stainless steel coil or a glass Liebig condenser with a running cold water supply
- A receiving vessel, a clean glass jar to catch the distillate
- A separator, a separatory funnel or the kind of gravity separator can that drains oil from water
- Amber glass bottles with tight caps for storage
- A thermometer, gloves and tongs
Commercial and home-scale gear look different but do the same job. The bigger difference is control. A commercial unit holds a steady low-pressure steam table and logs temperatures; a home rig relies on your attention.
Different plants want different handling. Lavender and peppermint are usually run fresh and loosely packed, a couple of days after cutting at most. Citrus peel is normally cold pressed instead of distilled, since the oils sit right in the flavedo and heat only degrades them. Rose petals are delicate and give up very little oil. Frankincense resin has to sit submerged in water, which makes it a hydrodistillation job rather than a steam one. Roots and bark need far longer runs and hotter handling than leaves.
Before you heat anything, check your local fire and safety rules. Unattended heating, open flames near dry plant matter and pressurised vessels are the three things that turn a hobby into an emergency.
Step-by-Step: How Essential Oils Are Distilled

This is how essential oils are distilled from start to finish, and how you tell at each stage that it is working. Prepare the material, set the apparatus, heat gently, condense, separate, then dry and store.
Step 1: Prepare the Plant Material
Accurate botanical identification comes first. Lavender, Spanish lavender and lavandin behave very differently in a still, and misidentification is a waste of a whole day’s fuel. Use the Latin name on your supplier’s documentation and record the plant part, the harvest date and the crop year.
Strip out damaged leaves, stones and debris. Do not wash the material and do not use anything with surface moisture, because extra water slows the run and pushes emulsified material into your receiver. Chop or break bulky material up so steam can pass through it evenly, and pack it loosely. Overpacking is the single most common beginner error and it starves the steam path, so a tight handful that crumbles when you squeeze it is the texture you are after.
Material that is old or bone dry has already lost most of its volatile oil. Old material yields far less than material used within a couple of days of harvest.
Step 2: Set Up the Distillation Equipment
Arrange the run in a straight line: plant material in the heated vessel, vapour takeoff pipe, condenser with cold water flowing through it, receiver, then the separator. Every joint has to be sealed tightly and supported so the weight of the hose does not pull on the pipe.
Use food-safe materials for anything that touches the oil or the distillate. Glass and copper are traditional, stainless steel is the modern workhorse and is what most commercial plants use. Copper can shift the chemistry of some oils slightly, which matters more to a perfumer than to a beginner, but it corrodes if you leave wet plant residue on it.
Ventilation is not optional. Run the rig outdoors or in a space with serious airflow, and never in a closed shed next to an open burner. Warning signs are not a reliable measure of safety here, so I would treat any improvised heating arrangement as unfinished until it has been checked by someone who builds stills.
Step 3: Heat the Plant Material Gently
Slow, even heat is what releases the volatiles without cooking them. Steam should move through the charge steadily rather than blasting through in bursts, and a sudden rush usually means the heat is too high or the packing is too tight.
The right temperature depends on the plant and the equipment, so follow the manufacturer’s numbers for your rig rather than a number from a forum post. Watch two things: the temperature trend and the flow of distillate. When the distillate runs clear and slow near the end of the run, the oil is mostly spent.
Never leave a heated still unattended, and keep water away from any electrical parts. Steam is what lifts the oil, which is why distillation works better than dropping plant material straight into boiling water. Direct boiling scorches the material and drags unwanted compounds into the oil.
Step 4: Condense and Collect the Distillate
In the condenser, the vapour meets a cold surface and becomes liquid again. That liquid is the distillate, and this is the moment beginners misread: what drips out is oil and water mixed together, not finished essential oil.
Collect it in a clean labelled glass vessel so you know what plant and which run it came from. Expect colour and clarity to change through the run. Early fractions often look milky or faintly cloudy because fine droplets of oil are suspended in the water, and that cloudiness usually settles over hours.
Step 5: Separate the Essential Oil from Water
A hydrosol is the aromatic water left behind. An essential oil is the small fraction of that distillate that is oil, and the two differ because most plant oils are non-polar while water is polar, so they refuse to mix and settle into layers.
Pour the distillate into a separatory funnel or a separator can and let gravity do the work. Light oils such as peppermint float in a thin layer on top. Heavy oils such as some vetiver blends and many root and bark oils sink instead, so check both the top and the bottom before you assume there is nothing there. A dropper works for small batches, though separating a few millilitres from a large jar is slow going.
Once you know what you have, label it for what it is. A distillate is not a drink, not a medicine and not something to put straight on skin. Concentrated oils can cause allergic sensitisation, and some are outright toxic if swallowed.
Step 6: Dry, Filter, and Store the Oil
Trace water in the oil encourages slow oxidation. Small batches can be left briefly over a drying agent, then poured off, but the simplest practical step is to keep the container open to a dry room for a short settling period before you cap it.
Filter only when it is warranted. A fine filter can strip out some of the heavier fragrant molecules you worked to collect, so most producers simply decant the clear oil and leave the sediment.
Label every batch with the Latin botanical name, the plant part, the method, the crop year and the date. Then store it in dark, airtight glass away from heat and light. That is the whole curing story: producers routinely let oils settle and outgas for two to three months in dark glass before bottling, which is why a fresh run can smell harsh or green and later smell rounder.
Common Mistakes
Almost every ruined batch traces back to one of these:
- Overheating or scorching the charge. It produces a burnt smell and dark, off notes. Fix: lower the heat, keep steam flow even, and stop before the material blackens.
- Wet or mouldy material. It slows the run and contaminates the distillate. Fix: use material with no surface moisture and discard anything mouldy.
- Overpacking the still. Steam cannot pass and you get almost nothing. Fix: pack loosely and leave headroom for expansion.
- Loose or leaking joints. You lose vapour, so you lose oil. Fix: seal and support every connection before you heat up.
- Weak ventilation. Vapour accumulates in the work area. Fix: work outdoors or with strong extraction, and never near a spark source.
- Treating distillate as essential oil. This is the most common misunderstanding of all. Fix: separate the layers, then identify what you have.
- Contaminating the receiver. A dirty jar or a shared dropper ruins a batch. Fix: clean, food-safe glass and a separate dropper for each oil.
- Storing in warm, light-exposed bottles. Heat and oxygen drive oxidation. Fix: amber glass, sealed, kept cool and dark.
- Using oils undiluted or internally. Concentrated oils can burn skin and can be dangerous if swallowed. Fix: dilute into a carrier oil for topical use, and never ingest without qualified clinical guidance.
One more thing on safety, because it is the part that matters most. Fire risk is real with any heated still and dry biomass. Skin sensitisation is the most common health complaint from essential oil use, and it can appear days after exposure. Keep bottles away from pets, out of reach of children, and consult a clinician during pregnancy or if you have allergies or a skin condition. If someone swallows an oil or gets a reaction, contact a poison-control service or a doctor rather than trying to treat it yourself.
Frequently Asked Questions
What is the difference between steam distillation and cold expression?
Steam distillation pushes hot steam through plant material to release volatile compounds, then condenses the vapour back to liquid. Cold expression is mechanical: citrus peels are pressed, usually with added water or heat, and the oil runs out without any distillation. Cold expression keeps heat-sensitive compounds intact, so it is the usual method for citrus oils.
Can I distill essential oils at home, and what is the safest method?
Yes, home distillation is legal in many places and it is a good way to learn, but the safest method is a purpose-built electric steam still with a sealed vessel, a proper condenser and controlled cooling, used outdoors with good ventilation. Avoid pressure cookers, open alcohol burners and any sealed vessel with improvised heating. Check your local fire rules and read the manufacturer’s manual fully before your first run.
Why do the oil and water separate after distillation?
Most plant oils are non-polar while water is polar, so the two refuse to mix and settle into distinct layers under gravity. Light oils such as peppermint float on the surface; heavy root, bark and resin oils sink and collect at the bottom. Both layers matter, and what drains off the top is the hydrosol, not the oil.
How can you tell if an essential oil is 100% pure?
Start with the label, which should give the Latin botanical name, the plant part, the extraction method and the batch or crop year. Oils diluted with carrier oil feel slick and pour differently, but visual checks are unreliable on their own. For real certainty you need gas chromatography, which is a laboratory test. Treat any seller who cannot name the plant species and the method as a warning sign.
How long does it take to distill essential oil from lavender?
A small home run usually takes a few hours of active distillation once you have charged the still, though some operators run closer to four to six hours for a fuller yield. A farm-scale lavender run processing something like 120 pounds of biomass can take most of a working day. The run ends when the distillate runs clear and slow rather than at a fixed clock time.
Do essential oils need to be cured before use?
Many producers let fresh oil settle in dark glass for two to three months before bottling. During that time the sharper, greener top notes soften and the aroma rounds out, and the batch can be filtered if a little sediment appears. You can use oil straight off the still, but it will smell harsher than the same oil six months later. Keep it in dark glass either way.
Conclusion
If you are starting out, the first safe action is to learn the equipment before you heat anything. Read the manual for the still, find out what your local fire rules require, and plan one small clean batch rather than a big ambitious run.
Use controlled equipment, keep the ventilation serious and stay with the still from start to finish. Then separate your oil properly, label the batch with the botanical name and date, and store it in dark glass. Essential oils can irritate skin and must never be swallowed or used in place of medical care, so if you want to use one on a person, talk to a doctor or pharmacist first.